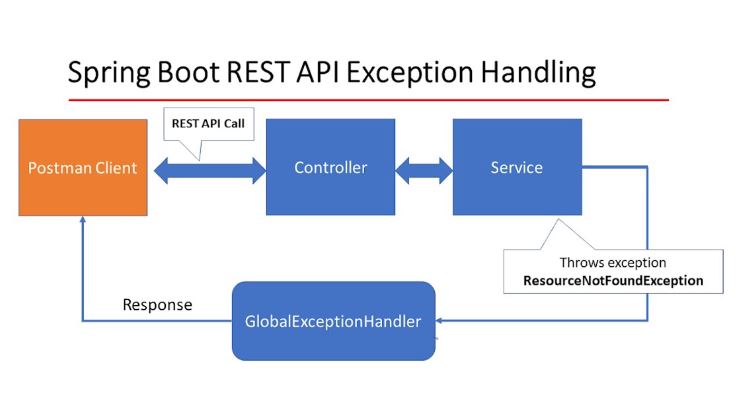
In this post, we are going to demonstrate how to validate and handle exceptions in Spring Boot REST API by creating a simple Spring Boot application.
1. Add the validation dependency to the POM file
To validate and handle exceptions in the spring boot application, we need to include the spring boot starter validation dependency in our POM file as shown below.
<?xml version="1.0" encoding="UTF-8"?>
<project xmlns="http://maven.apache.org/POM/4.0.0" xmlns:xsi="http://www.w3.org/2001/XMLSchema-instance"
         xsi:schemaLocation="http://maven.apache.org/POM/4.0.0 https://maven.apache.org/xsd/maven-4.0.0.xsd">
    <modelVersion>4.0.0</modelVersion>
    <parent>
        <groupId>org.springframework.boot</groupId>
        <artifactId>spring-boot-starter-parent</artifactId>
        <version>2.6.6</version>
        <relativePath/> <!-- lookup parent from repository -->
    </parent>
    <groupId>com.fixdecode</groupId>
    <artifactId>rest-exception-demo</artifactId>
    <version>0.0.1-SNAPSHOT</version>
    <name>rest-exception-demo</name>
    <description>rest-exception-demo</description>
    <properties>
        <java.version>17</java.version>
    </properties>
    <dependencies>


 //
//
//

        <dependency>
            <groupId>org.springframework.boot</groupId>
            <artifactId>spring-boot-starter-validation</artifactId>
        </dependency>
 //
//
//


    </dependencies>

    <build>
        <plugins>
            <plugin>
                <groupId>org.springframework.boot</groupId>
                <artifactId>spring-boot-maven-plugin</artifactId>
                <configuration>
                    <excludes>
                        <exclude>
                            <groupId>org.projectlombok</groupId>
                            <artifactId>lombok</artifactId>
                        </exclude>
                    </excludes>
                </configuration>
            </plugin>
        </plugins>
    </build>

</project>
here is the properties.yml file.
server:
  port: 9292

spring:
  datasource:
    url: jdbc:mysql://localhost:3306/exception_db
    username: user
    password: user
    driver-class-name: com.mysql.cj.jdbc.Driver
  jpa:
    hibernate:
      ddl-auto: update
    show-sql: true
2. Create the JPA Entity Class.
Now, let’s create the JPA entity class called User.
Note that we have used some annotations on the User attributes where we have defined the messages that will be shown to the user should any of the attributes has invalid data such as an invalid email address or field left empty.
@Blank()
@Email()
import lombok.AllArgsConstructor;
import lombok.Getter;
import lombok.NoArgsConstructor;
import lombok.Setter;

import javax.persistence.Entity;
import javax.persistence.GeneratedValue;
import javax.persistence.GenerationType;
import javax.persistence.Id;
import javax.validation.constraints.Email;
import javax.validation.constraints.NotBlank;

@Entity
@Getter
@Setter
@NoArgsConstructor
public class User {
    @Id
    @GeneratedValue(strategy = GenerationType.IDENTITY)
    private Long id;
    @NotBlank(message = "Please, tell us your name")
    private String name;
    @Email(message = "Email address not valid ")
    private String email;
    @NotBlank(message = "Password is required")
    private String password;
    @NotBlank(message = "Please, specify your country")
    private String country;

    public User(String name, String email, String password, String country) {
        this.name = name;
        this.email = email;
        this.password = password;
        this.country = country;
    }
}
What is the difference between @NotNull @NotEmpty and @NotBlank constraints in bean validation?
Some of the most common validation annotations are
@NotNull: to say that a field must not be null.
@NotEmpty: to say that a list field must not be empty.
@NotBlank: to say that a string field must not be the empty string (i.e. it must have at least one character).
3. Create an HTTP response class for the user Entity
import lombok.Builder;
import lombok.Data;
import org.springframework.http.HttpStatus;

import java.util.Map;

@Data
@Builder
public class ResponseMessage {
    private Integer statusCode;
    private HttpStatus status;
    private Map<?, ?> data;
}
4. Create the controller class for the user entity.
import lombok.AllArgsConstructor;
import org.springframework.http.HttpStatus;
import org.springframework.http.ResponseEntity;
import org.springframework.web.bind.annotation.*;

import javax.validation.Valid;
import java.util.List;
import java.util.Map;

import static org.springframework.http.HttpStatus.OK;

@RestController
@AllArgsConstructor
@RequestMapping("api/users")
public class UserController {
    private UserService userService;


// Get all users from the database.
    @GetMapping
    public ResponseEntity<ResponseMessage> getAllUsers(){
        return ResponseEntity.ok(
                ResponseMessage.builder()
                        .data(Map.of("Users found", userService.getAllUsers()))
                        .status(HttpStatus.OK)
                        .statusCode(OK.value())
                        .build());
    }

// Add a New User

    @PostMapping
    public ResponseEntity<ResponseMessage> addUser(@RequestBody @Valid User user){
        return ResponseEntity.ok(
                ResponseMessage.builder()
                        .data(Map.of("A new was added",userService.addUser(user)))
                        .status(OK)
                        .statusCode(OK.value())
                        .build());
    }

// Get a user by the Id

    @GetMapping("/{id}")
    public ResponseEntity<ResponseMessage> getUser(@PathVariable("id") Long id){
        return ResponseEntity.ok(
                ResponseMessage.builder()
                        .data(Map.of("User found", userService.getUser(id)))
                        .status(HttpStatus.OK)
                        .statusCode(OK.value())
                        .build());
    }
Notice how we have used the @Valid annotation inside the ” Add New User ” method. This will ensure that every attribute of the user contains valid data before saving it to the database.
5. Create the Service class for the user entity.
import com.fixdecode.restexceptiondemo.exceptions.UserNotFoundException;
import lombok.AllArgsConstructor;
import org.springframework.stereotype.Service;

import java.util.List;

@Service
@AllArgsConstructor
public class UserService {
    private UserRepository userRepository;

    public List<User> getAllUsers() {
       return userRepository.findAll().stream().toList();
    }

    public User addUser(User user) {
        return userRepository.save(user);
    }

    public User getUser(Long id) {
        return userRepository.findById(id)
                .orElseThrow(() ->new UserNotFoundException(String.format("User with Id %s not fond",id)));
    }
}
6. Create the user repository interface.
Now, create the repository interface for the user entity to extend the JPA Repository in order to gain access to free CRUD operation.
import org.springframework.data.jpa.repository.JpaRepository;

public interface UserRepository extends JpaRepository<User, Long> {
}
7. Create the Exception handler classes
Now create a package called exceptions and create the following 2 classes in there.
The Global Exception Handler Class.
import org.springframework.http.HttpStatus;
import org.springframework.web.bind.MethodArgumentNotValidException;
import org.springframework.web.bind.annotation.ExceptionHandler;
import org.springframework.web.bind.annotation.ResponseStatus;
import org.springframework.web.bind.annotation.RestControllerAdvice;

import java.util.HashMap;
import java.util.Map;

@RestControllerAdvice
public class ExceptionHandlerDemo {

    @ResponseStatus(HttpStatus.BAD_REQUEST)
    @ExceptionHandler(MethodArgumentNotValidException.class)
    public Map<String, String> handleException(MethodArgumentNotValidException ex){
        Map<String, String> errors = new HashMap<>();
        ex.getBindingResult()
                .getFieldErrors()
                .forEach(error -> errors.put(error.getField(), error.getDefaultMessage()));
        return errors;
    }

    @ResponseStatus(HttpStatus.BAD_REQUEST)
    @ExceptionHandler(UserNotFoundException.class)
    public Map<String, String> userNotFound(UserNotFoundException ex){
        Map<String, String> error = new HashMap<>();
        error.put("error", ex.getMessage());
        return error;
    }
}
8. Create a Custom Exception Handler Class for the User.
public class UserNotFoundException extends RuntimeException {
    public UserNotFoundException(String message) {
        super(message);
    }
}
9. Finally, Run and Test API with Postman.
Happy Coding…

